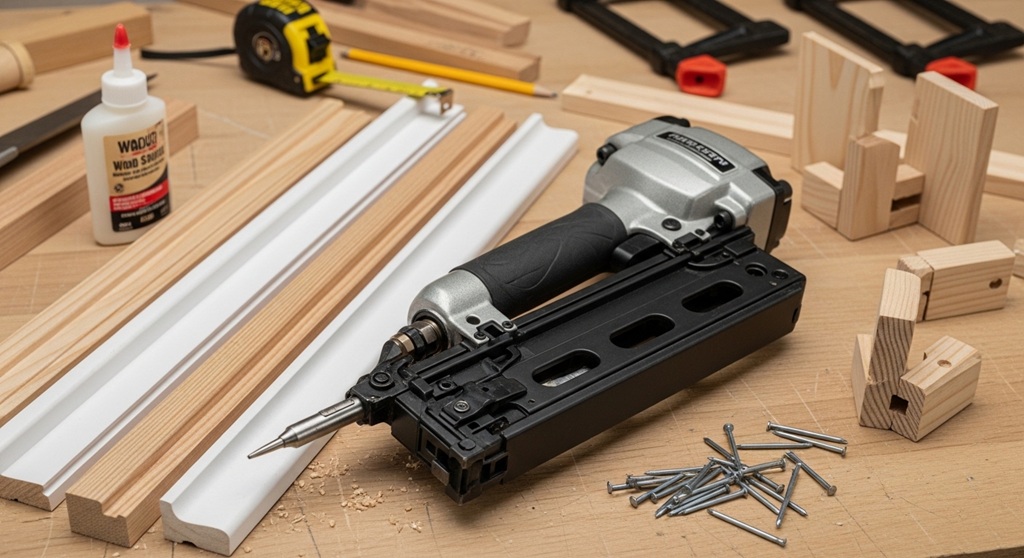
Trim work and furniture assembly demand precision. Small gaps, split wood, or visible fasteners can ruin an otherwise clean finish. That’s why many carpenters, DIY builders, and furniture makers rely on a brad nailer. A brad nailer is a lightweight pneumatic or cordless tool that drives thin 18-gauge brad nails into wood. These nails hold trim, moldings, and delicate materials without leaving large holes.
Understanding brad nailer uses is essential if you want professional results in woodworking or home improvement. Brad nailers are commonly used for installing baseboards, attaching decorative trim, building cabinets, assembling small furniture, and securing lightweight wood pieces before glue dries.
This trim nailer guide explains how to use a brad nailer safely and effectively. You will learn when to use it, how it works, how to choose the right nails, and how to avoid common mistakes. Whether you are installing crown molding or building a small furniture project, the right technique can save time and improve accuracy.
According to a 2023 woodworking survey by the Home Improvement Research Institute, over 62% of DIY builders prefer brad nailers for trim installation because they reduce visible fastener marks and speed up installation by up to 40% compared with manual nailing.
If you want clean edges, faster assembly, and stronger joints, learning how to use a brad nailer properly is a skill worth mastering.
What Is a Brad Nailer and How Does It Work?
Short answer: A brad nailer is a power tool that drives thin 18-gauge brad nails into wood to secure trim, moldings, and light woodworking pieces with minimal surface damage.
A brad nailer operates using compressed air, battery power, or a hybrid mechanism. When the trigger is pulled, the tool pushes a thin nail into the material at high speed.
The thin profile of a brad nail reduces wood splitting and leaves a small hole that is easy to hide with wood filler.
Main Components of a Brad Nailer
- Magazine – Holds the strip of brad nails
- Trigger – Activates the nail firing mechanism
- Depth adjustment wheel – Controls how deep the nail is driven
- Nose tip – Guides the nail into the wood
- Air inlet or battery pack – Powers the tool
Brad nailers typically fire 18-gauge nails ranging from 5/8 inch to 2 inches long. The small diameter makes them ideal for delicate trim pieces.
What Are the Most Common Brad Nailer Uses?
Short answer: Brad nailers are used for trim installation, furniture assembly, cabinet work, paneling, and small woodworking projects.
Because brad nails are thin and nearly invisible, they are widely used in finish carpentry.
Most Popular Applications
- Installing baseboards
- Attaching crown molding
- Securing window trim
- Building small furniture
- Cabinet backing and panels
- Wood craft projects
- Decorative molding installation
Brad nailers are often used together with wood glue. The nails hold pieces in place while the adhesive cures.
This combination creates strong joints without visible fasteners.
How Do You Use a Brad Nailer Step-by-Step?
Short answer: To use a brad nailer, load nails, adjust depth settings, position the tool correctly, and fire nails carefully along the trim piece.
Step 1: Load the Brad Nails
Open the magazine and slide a strip of 18-gauge brad nails into the chamber. Ensure they sit correctly in the rail.
Step 2: Connect Power Source
- Pneumatic models require an air compressor.
- Cordless models use lithium batteries.
Check pressure settings if using compressed air. Most trim nailers operate between 70–120 PSI.
Step 3: Adjust Nail Depth
Use the depth adjustment dial to control how far the nail penetrates the wood. Nails should sit slightly below the surface.
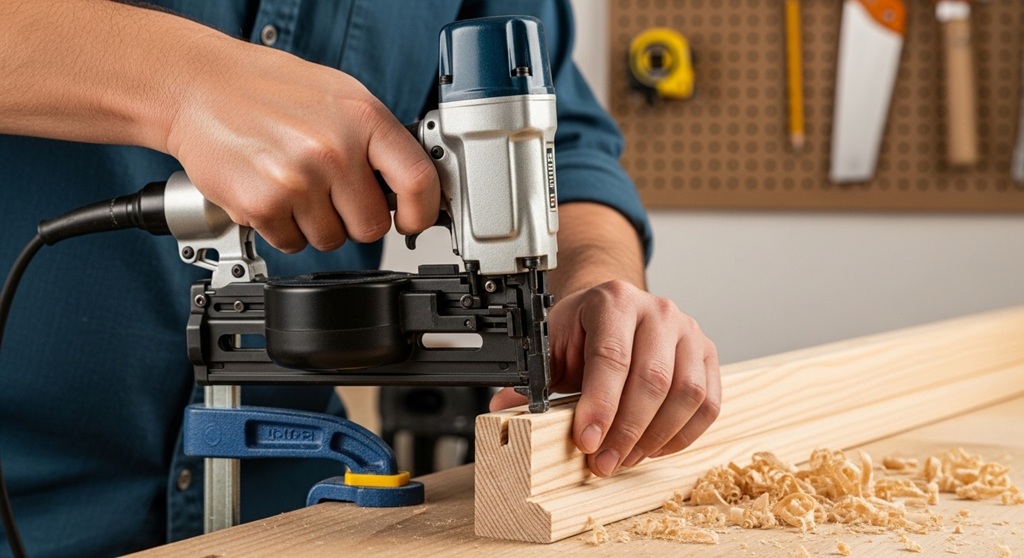
Step 4: Position the Tool
Hold the nailer perpendicular to the trim piece. This ensures straight nail placement and prevents bending.
Step 5: Fire the Nail
Press the nose tip against the wood and pull the trigger. Move evenly along the trim piece.
Step 6: Fill Nail Holes
After installation, fill the small holes with wood filler and lightly sand the surface.
Which Nail Size Should You Use for Trim and Furniture?
Short answer: Choose nail length based on material thickness. A common rule is that the nail should penetrate at least twice the thickness of the top piece.
| Material | Recommended Nail Length |
|---|---|
| Small trim pieces | 5/8 – 1 inch |
| Baseboards | 1.25 – 1.5 inches |
| Cabinet trim | 1 – 1.5 inches |
| Furniture assembly | 1.5 – 2 inches |
Using nails that are too long may cause them to exit through the wood.
What Safety Tips Should You Follow When Using a Brad Nailer?
Short answer: Always wear protective gear, keep hands away from the firing area, and disconnect power when loading nails.
Important Safety Practices
- Wear safety glasses
- Keep fingers clear of the firing path
- Disconnect power before clearing jams
- Never point the nailer toward people
- Use the correct air pressure
According to the U.S. Consumer Product Safety Commission, nail gun accidents cause thousands of injuries each year, many due to improper handling.
What Are the Advantages of Using a Brad Nailer?
Short answer: Brad nailers provide cleaner finishes, faster installation, and reduced wood damage.
Key Benefits
- Minimal nail holes
- Less wood splitting
- Faster trim installation
- Better accuracy
- Cleaner finishing work
Professional carpenters often prefer brad nailers because they improve productivity.
A case study from Fine Woodworking Magazine showed that trim installation time dropped from 4 hours to 2.5 hours when switching from manual hammering to a pneumatic brad nailer.
What Are the Common Mistakes When Using a Brad Nailer?
Short answer: The most common mistakes include using incorrect nail sizes, applying excessive pressure, and failing to adjust nail depth.
Frequent Errors
- Driving nails too deep
- Using nails that are too long
- Nailing too close to wood edges
- Ignoring depth adjustments
- Skipping safety checks
Avoiding these mistakes helps prevent damaged trim or weakened joints.
Brad Nailer vs Finish Nailer: What Is the Difference?
Short answer: Brad nailers use 18-gauge nails for delicate trim, while finish nailers use thicker 15- or 16-gauge nails for heavier materials.
| Feature | Brad Nailer | Finish Nailer |
|---|---|---|
| Nail gauge | 18 gauge | 15 or 16 gauge |
| Hole size | Very small | Larger |
| Best use | Trim and small wood pieces | Door frames and heavy trim |
| Splitting risk | Low | Moderate |
Conclusion: Is a Brad Nailer Worth Using for Trim and Furniture?
Yes, a brad nailer is one of the most practical tools for trim installation and light woodworking. It drives thin 18-gauge nails that hold materials securely while leaving nearly invisible holes. This makes it ideal for baseboards, crown molding, cabinetry, and small furniture projects.
Compared with manual hammering, a brad nailer speeds up installation and improves accuracy. Studies in the woodworking industry show that powered nailers can reduce installation time by up to 40% while producing cleaner results.
However, proper technique matters. Choosing the correct nail length, adjusting depth settings, and following safety practices ensures the best outcome.
If you are serious about DIY carpentry or furniture building, learning how to use a brad nailer correctly can save hours of work and produce professional-quality finishes.
Ready to upgrade your woodworking projects? Invest in a reliable brad nailer, practice proper trim installation techniques, and start building cleaner, stronger furniture and interior trim today.
Frequently Asked Questions (FAQ)
Can a brad nailer be used for furniture building?
Yes. Brad nailers are commonly used in furniture assembly, especially for lightweight frames, drawer components, and decorative panels. The thin 18-gauge nails hold pieces in place while glue dries.
What size nails should I use in a brad nailer?
Most brad nailers use 18-gauge nails ranging from 5/8 inch to 2 inches long. The correct size depends on the thickness of the materials you are joining.
Do brad nails require wood filler?
Yes. Although brad nails leave small holes, applying wood filler and sanding ensures a smooth, professional finish before painting or staining.
Can a brad nailer replace screws?
No. Brad nails provide temporary holding power and are best used with glue. Screws offer stronger structural support and should be used for load-bearing joints.
Is a brad nailer good for installing baseboards?
Yes. Brad nailers are commonly used for baseboard installation because they minimize visible holes and prevent splitting in thin trim pieces.
Do brad nailers split wood?
Brad nailers reduce the risk of splitting compared with thicker nails. However, driving nails too close to edges may still cause cracks.
Are cordless brad nailers reliable?
Modern cordless brad nailers are reliable and powerful. Many professionals use battery-powered models for mobility and convenience on job sites.
Read More Also: How everyday habits can reduce the risk of fire in your home
Find out: Fitted Wardrobe Colour Trends (That Are Here to Stay)
